The HP Pavilion Gaming 15 ships with a mechanical hard drive or a budget SATA SSD in many configurations. Replacing it with an M.2 NVMe SSD is the single most effective performance upgrade for this laptop — load times drop dramatically and the system becomes far more responsive under gaming workloads. This guide covers preparation, physical installation, and cloning so you keep all your games and Windows installation.
Step 1 – Confirm Your HP Pavilion Gaming 15 Has an M.2 Slot
- Look up your full model number (on the underside label or in Settings → System → About).
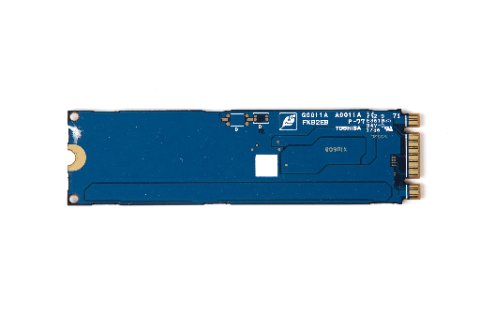
- Go to support.hp.com and download the Maintenance and Service Guide for your exact Pavilion Gaming 15 variant. Look under the Storage section to confirm an M.2 2280 slot is present and whether it supports SATA, NVMe Gen 3, or NVMe Gen 4.
- Most HP Pavilion Gaming 15 units released from 2019 onward include an M.2 2280 slot. Some also retain a 2.5-inch SATA bay for a secondary drive.
Step 2 – Choose the Right NVMe SSD
- Verify the slot supports NVMe — refer to Step 1. If SATA-only, purchase an M.2 SATA drive instead.
- Select an M.2 2280 NVMe PCIe Gen 3 x4 drive for compatibility with most Pavilion Gaming 15 models (e.g., WD Black SN770, Samsung 970 EVO Plus). A Gen 4 drive in a Gen 3 slot works at Gen 3 speeds, so there is no harm in purchasing Gen 4 for future-proofing.
- Match or exceed your current storage size to simplify cloning. 1TB is the recommended minimum for a gaming build.
Step 3 – Clone the Original Drive Before Removing It
- Connect the new NVMe drive via a USB-to-M.2 enclosure (widely available for under ).
- Download and run Macrium Reflect Free or Samsung Data Migration (if using a Samsung drive). Select your current system drive as source and the new M.2 as destination.
- Choose Clone this disk. Allow the software to resize partitions to fill the new drive if it is larger. The clone typically completes in 20–60 minutes depending on data volume.
- After cloning, shut down and disconnect the USB enclosure before proceeding to physical installation.
Step 4 – Open the HP Pavilion Gaming 15 and Install the SSD
- Shut down the laptop completely. Unplug the power adapter.
- Remove all screws from the bottom panel. Note: some screws may be hidden under rubber feet — peel them back carefully with a spudger.
- Use a plastic pry tool to separate the bottom panel. Start from a rear corner and work around the perimeter. The panel clips release with moderate lateral pressure.
- Locate the M.2 slot on the motherboard. Remove the single brass retention screw at the end of the slot.
- Insert the NVMe drive at approximately 30 degrees into the slot, then press it flat against the board and replace the retention screw. Do not overtighten.
- If the laptop had a separate 2.5-inch HDD, disconnect and remove it now if you are replacing it entirely — it is no longer needed.
- Reassemble the bottom panel and reinstall all screws.
Per HP’s service documentation for HP Pavilion Gaming 15 series, “The M.2 2280 slot accepts PCIe Gen3 x4 NVMe SSDs. Ensure all data is backed up before performing any storage replacement procedure.”
Step 5 – Boot and Verify
- Power on the laptop. If the clone was successful, Windows boots directly from the new NVMe drive without any reinstallation required.
- Open Disk Management (right-click Start → Disk Management) and confirm only the new SSD appears as the system drive. If the original drive was removed, only one disk appears.
- Run CrystalDiskMark to verify NVMe performance. A healthy PCIe Gen 3 x4 NVMe drive shows sequential reads above 2,000 MB/s. SATA drives show below 600 MB/s.
- Check Device Manager → Disk drives — the drive should display with NVM Express in the hardware ID string.
Frequently Asked Questions
Can I keep the original HDD and add the NVMe as a second drive?
Yes, if your Pavilion Gaming 15 variant includes a 2.5-inch SATA bay alongside the M.2 slot. Install Windows or games on the NVMe and use the HDD for slower storage. Check your Service Guide for the secondary bay.
Do I need to reinstall Windows after swapping the SSD?
Not if you clone first. A clean clone transfers the boot partition and your digital license. Windows activates automatically after first boot using the digital license tied to your motherboard.
The laptop does not boot after the SSD swap — what should I check?
Enter BIOS (F10 or Esc on HP) and confirm the new drive appears under Storage. If it does not appear, re-seat the M.2 drive. If it appears but Windows does not boot, the clone may not have transferred the EFI partition — redo the clone and ensure the EFI partition is included.
Will my game saves transfer automatically after cloning?
Yes. Game saves stored locally (in Documents, AppData, or Steam’s userdata folder) transfer as part of the clone. Cloud-synced saves remain on the server regardless.
Conclusion
Installing an M.2 2280 NVMe SSD in an HP Pavilion Gaming 15 is a beginner-friendly upgrade that delivers the largest performance gain per dollar in modern gaming laptops. Cloning your existing drive before swapping means no reinstallation, no lost games, and no Windows activation issues. Confirm your M.2 slot type from the HP Service Guide before purchasing a drive, and verify with CrystalDiskMark afterward to confirm NVMe speeds are achieved.
Leave a Reply