Yes, you can replace a ThinkPad USB-C charging port yourself — but whether you should depends on your specific model, your soldering skill, and how the port actually failed.
This guide covers everything from diagnosing whether the port is truly broken, to understanding the underlying USB-C architecture, to actually replacing the port on supported ThinkPad models. If you own a T480, T490, T14, X1 Carbon, E14, or E15, there is specific information here for your model. We will also cover when board-level repair is necessary and when it is better to pay a professional.
Is Your ThinkPad USB-C Port Actually Broken? (Diagnose First)
Before you buy parts or pick up a soldering iron, you need to confirm the port is the actual problem. Many USB-C charging failures on ThinkPads are caused by software, firmware, or the Power Delivery (PD) controller – not a physically damaged port. Replacing the port will not fix a PD controller issue.
Step 1: Check for Physical Damage
Inspect the USB-C port under good lighting or a magnifying glass. Look for:
- Bent or missing pins inside the port
- The port housing is loose or moves when you push the cable in
- Burn marks or discolouration around the port opening
- The port has physically detached from the board (you can sometimes hear it rattle)
If you see any of these, there is likely physical damage. Continue with this guide. If the port looks fine, work through the software checks below first.
Step 2: Test With a Different Charger and Cable
Use a known-good USB-C PD charger – ideally 65W or 90W – and a different cable rated for USB-C PD. Some cables are charge-only and will not trigger proper PD negotiation. If a second charger and cable combination works, your original charger or cable is the problem, not the port.
Step 3: Check Device Manager for PD Controller Errors
On Windows, open Device Manager then Universal Serial Bus controllers. Look for any devices showing a yellow warning triangle. The entries to check are:
- USB Billboard Device – appears when PD negotiation fails
- Intel USB 3.1 eXtensible Host Controller – errors here suggest a deeper controller issue
- Any entry labelled Unknown USB Device under the USB controllers section
If you see errors here but no physical damage, the issue may be a firmware or PD controller problem rather than a broken port.
Step 4: Run Lenovo Diagnostics
Lenovo’s built-in hardware diagnostic tool can test the USB-C controller directly. Press F10 at boot (on most ThinkPad models) or download Lenovo Diagnostics from support.lenovo.com. Run the USB controller test. A failure here points to the PD controller or the port itself.
Step 5: Check BIOS and Firmware
An outdated BIOS can cause USB-C charging and Thunderbolt issues on ThinkPads. Go to support.lenovo.com, enter your machine type, and check if there is a BIOS update available. Several T490 and T14 Gen 1 owners have resolved USB-C charging failures with a BIOS update alone – no hardware work needed.
Understanding ThinkPad USB-C Port Architecture
A ThinkPad USB-C port is not a simple connector. It handles multiple independent functions over the same physical socket, and each function can fail separately.
What the USB-C Port Actually Does
On most modern ThinkPads, each USB-C/Thunderbolt port carries:
- USB 3.x data – regular data transfer to drives, peripherals
- USB Power Delivery (PD) – charging, negotiated via the CC (Configuration Channel) pins
- DisplayPort Alt Mode – video output to monitors via the same port
- Thunderbolt 3 or 4 (on higher-end models) – high-bandwidth data and daisy-chaining
The USB-C PD Controller
USB-C Power Delivery works through a negotiation process. When you plug in a charger, the PD controller on your ThinkPad’s motherboard communicates with the charger over the CC pins to agree on voltage and current. Most ThinkPad chargers operate at 20V, with current ranging from 2.25A (45W) to 4.5A (90W).
If you use a charger with the wrong wattage – especially one that outputs higher voltage than expected – it can damage the PD controller IC on the motherboard. Common chips include the TI TPS65987 and similar surface-mount ICs soldered directly to the board. Replacing a damaged PD controller requires BGA or fine-pitch SMD soldering skills.
Warning: Using non-Lenovo chargers that do not properly implement the USB-C PD specification is one of the most common causes of PD controller damage on ThinkPads. Always use USB-IF certified PD chargers.
How the Port Connects to the Board
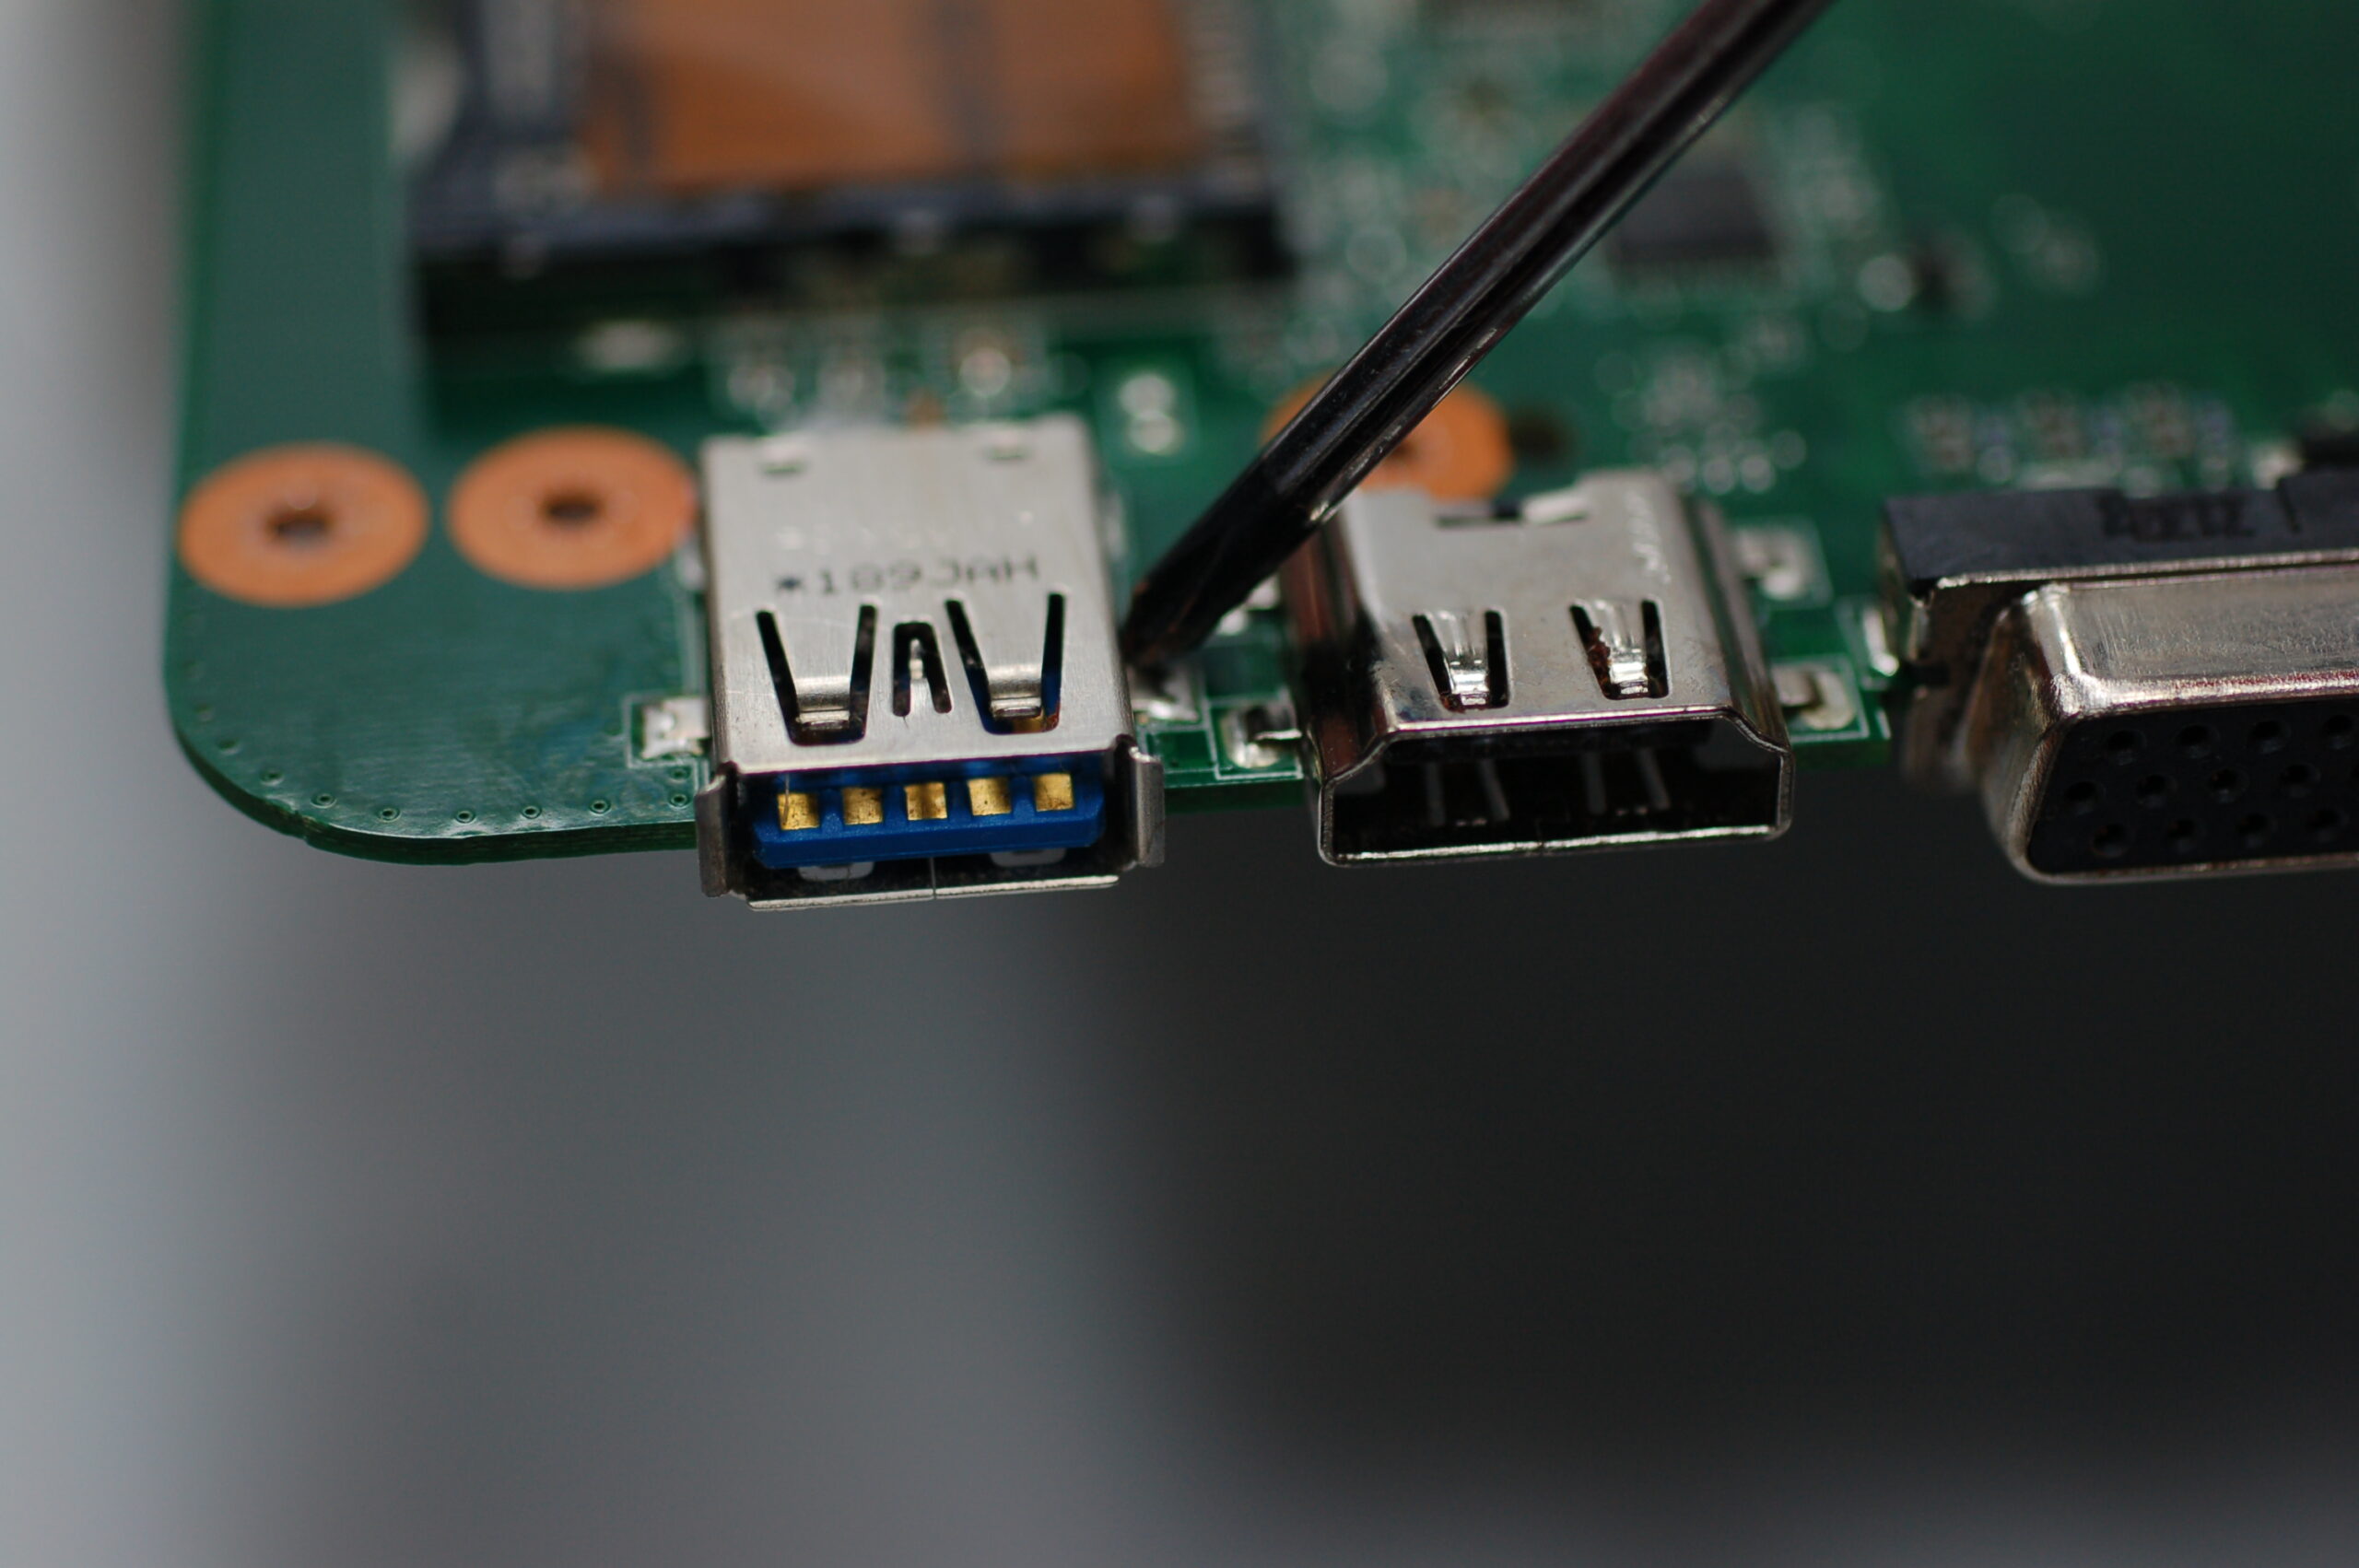
On most ThinkPad models, the USB-C port is soldered directly to the motherboard – there is no separate daughterboard. This means replacement requires desoldering a 24-pin SMD connector, which is a delicate job even for experienced technicians.
Which ThinkPad Models Have Replaceable USB-C Ports?
| Model | USB-C Port Type | Repair Method | Difficulty |
|---|---|---|---|
| T480 / T480s | USB-C (non-Thunderbolt on T480), Thunderbolt 3 on T480s | Soldered to motherboard – SMD desoldering required | Advanced |
| T490 / T490s | Thunderbolt 3 USB-C | Soldered to motherboard | Advanced |
| T14 Gen 1 | Thunderbolt 3 USB-C (Intel models only) | Soldered to motherboard | Advanced |
| T14 Gen 2 (AMD) | USB-C (no Thunderbolt) | Soldered to motherboard | Advanced |
| T14 Gen 2 (Intel) | Thunderbolt 4 USB-C | Soldered to motherboard | Advanced |
| X1 Carbon Gen 6 | Thunderbolt 3 USB-C | Soldered to motherboard | Advanced |
| X1 Carbon Gen 7-9 | Thunderbolt 3 USB-C | Soldered to motherboard | Advanced |
| X1 Carbon Gen 10-12 | Thunderbolt 4 USB-C | Soldered to motherboard | Advanced |
| E14 Gen 1-2 | USB-C (USB 3.2 Gen 1, no Thunderbolt) | Soldered to motherboard | Intermediate-Advanced |
| E15 Gen 1-2 | USB-C (USB 3.2 Gen 1, no Thunderbolt) | Soldered to motherboard | Intermediate-Advanced |
Important note on T480 vs. newer models: The T480 gives better access to the motherboard. On T14 Gen 2 and newer, the board is more compact. The E14 and E15 carry only USB data and charging – no Thunderbolt – making the repair slightly simpler.
Tools and Parts You Need
Tools
| Tool | Purpose | Notes |
|---|---|---|
| Hot air rework station | Removing and reflowing the SMD USB-C connector | Adjustable temperature 300-380C. Basic soldering irons are not enough. |
| Fine-tip soldering iron (T12 or similar) | Touch-up soldering after hot air work | 0.2-0.4mm tip recommended |
| Flux (no-clean, rosin-based) | Helps solder flow and prevents cold joints | Gel flux preferred for SMD work |
| Solder wick (desoldering braid) | Removing old solder from pads | 2.0-2.5mm width |
| Low-melt solder (Bi58/Sn42) | Optional – reduces thermal stress on board | Melts at ~138C |
| ESD-safe tweezers | Handling small components | Ground yourself with ESD strap before touching the board |
| Isopropyl alcohol (90%+) and brush | Cleaning flux residue | Do not use lower-concentration alcohol |
| Tri-point Y000 screwdriver + Torx T5 | Opening the ThinkPad chassis | Most ThinkPads use a mix of these screw heads |
| Plastic pry tools / spudger | Opening the case without damage | Metal tools will scratch and can cause shorts |
| USB microscope or magnifying glass (10x+) | Inspecting solder joints | USB-C pads are very small |
| ESD wrist strap + mat | Protecting board from static discharge | Do not skip this. Static can silently damage the PD controller. |
Replacement USB-C Port: Part Numbers and Sourcing
Finding the correct replacement port is critical. The physical port looks the same across many models, but the PCB footprint may differ.
- Lenovo FRU system: Search parts.lenovo.com using your machine type number (found on the sticker under your ThinkPad).
- AliExpress: Search “ThinkPad T480 USB-C charging port SMD” or “ThinkPad X1 Carbon USB-C connector 24-pin”. Include your model in the search.
- iFixit: iFixit Lenovo parts section stocks some ThinkPad components with compatibility guidance.
Common footprint: 24-pin USB Type-C SMD receptacle. The T480 typically uses a vertical-mount connector. The X1 Carbon uses a right-angle mount. Confirm orientation and pin pitch before ordering.
Step-by-Step USB-C Port Replacement
Warning: This procedure carries real risks. You can permanently damage your motherboard if temperatures are too high or solder bridges form. If you are not confident with SMD rework, skip to the professional repair section. This repair also voids any remaining Lenovo warranty.
Step 1: Prepare Your Workspace
- Work on a clean, flat, ESD-safe surface.
- Put on your ESD wrist strap and connect it to a grounded surface.
- Ensure good lighting – a desk lamp plus magnifying glass stand is ideal.
- Have all tools and the replacement port ready before opening the laptop.
Step 2: Disassemble the ThinkPad
- Power off completely. Do not just put it to sleep.
- For internal-battery models (T490, X1 Carbon, T14), open the bottom panel and disconnect the battery connector first.
- Remove all bottom panel screws – some are captive (just loosen, they do not fall out).
- Use a plastic spudger to gently pry the bottom panel away from the clips. Work around the perimeter.
- Photograph the motherboard before removing anything else.
Step 3: Remove the Motherboard (if required)
- Disconnect all ribbon cables and antenna cables. Label or photograph each connector.
- Remove the motherboard mounting screws (usually 2-4).
- Lift the motherboard out carefully, tilting slightly to clear port cutouts in the chassis.
- Place on your ESD mat, component-side up.
Step 4: Remove the Damaged USB-C Port
- Apply flux generously around all pads of the USB-C connector.
- Optional: Apply low-melt solder to all visible pins to reduce working temperature.
- Set hot air station to 320-350C with medium airflow. Too much airflow blows nearby small components off the board.
- Move the nozzle in slow circular motions. Heat evenly – do not focus on one side.
- After 30-60 seconds, gently try to lift the connector with ESD tweezers. If it does not move freely, apply more heat. Do not force it – forcing rips pads off the board.
- Once free, use solder wick and flux to clean all pads flat and shiny.
- Inspect under magnification. If any pad has lifted, repair the trace before proceeding.
Step 5: Solder the New USB-C Port
- Apply a thin layer of flux to the cleaned pads.
- Position the new port carefully. Alignment must be exact – inspect from multiple angles.
- Tack one corner pin with a fine-tip iron. Check alignment again.
- Use hot air at 300-320C to reflow the connector slowly around the base.
- Let the board cool 2-3 minutes before touching.
- Inspect every joint under magnification. Fix bridges or cold joints with fine-tip iron and flux.
- Clean all flux residue with 90%+ isopropyl alcohol and a brush. Let dry completely.
Step 6: Reassemble the ThinkPad
- Reinstall the motherboard and reconnect all cables from your photos.
- Reconnect the battery cable.
- Replace the bottom panel. Do not overtighten screws.
- Do a power-on test before fully closing the case.
After Replacement – Testing and Driver Setup
Initial Power-On Test
Connect a USB-C PD charger and watch for the charging LED. If it lights up, the port is receiving power. Boot into Windows before further testing.
Check Device Manager
Go to Device Manager then Universal Serial Bus controllers. All entries should appear without yellow warning triangles. For Thunderbolt models, also check Device Manager then System devices for the Thunderbolt controller.
Test All Port Functions Separately
- Charging: Confirm battery charges via the Windows taskbar indicator.
- USB data: Plug in a USB-C drive and confirm detection in File Explorer.
- DisplayPort Alt Mode: Connect a USB-C to HDMI/DisplayPort cable and confirm video output.
- Thunderbolt (if applicable): Connect a Thunderbolt device and check Device Manager.
Update Thunderbolt and USB Firmware
Go to support.lenovo.com, enter your model, and check for Thunderbolt Firmware Update or USB-C PD Firmware entries. Update if available.
When to Seek Professional Repair Instead
- Pad lift during removal: Trace repair requires schematics and skilled hands. A specialist is the better choice.
- PD controller damage: Device Manager shows errors but port looks intact – the PD controller IC has failed. BGA rework required.
- X1 Carbon Gen 9 and newer: Very thin, densely packed boards. Risk of collateral damage is high. Professional repair often costs less than a damaged motherboard.
- Under warranty: Check warranty status at support.lenovo.com first. Lenovo may cover the repair at no cost.
I have a Computer Science degree and over 20 years working with PC hardware, and I still send certain board-level repairs to a specialist. A reputable micro-soldering shop will charge roughly USD 80-150 for this repair – far cheaper than a replacement motherboard.
Per James Whitfield, who is a Senior IT Administrator at Meridian Financial Group, “I had a T480 with a broken USB-C port – we sent it to a local board repair shop after our internal tech said the pad situation looked risky. They had it back in two days, fully working, and the repair cost less than a refurb unit would have.”
I ran into a similar situation with a T480 I was repairing for a colleague. The port housing was cracked and the charging LED came on only intermittently. I replaced the port successfully after confirming under a 10x loupe that all pads were clean and intact before the new port went on.
On another occasion, an X1 Carbon Gen 10 had completely stopped charging but the port looked perfect. Device Manager showed a USB Billboard Device error every time a charger connected. A BIOS update from Lenovo’s support page fixed it entirely – no hardware work needed.
Frequently Asked Questions
Can I use any USB-C charger with my ThinkPad after port replacement?
You should use a USB-C PD charger that meets Lenovo’s wattage recommendation for your model – usually 45W, 65W, or 90W. Chargers that do not properly implement the USB-C PD specification can damage the PD controller. Always look for USB-IF certified PD chargers. Brands like Anker or Belkin with proper PD certification are generally safe.
How do I know if it is the port or the PD controller that is broken?
Physical damage (bent pins, loose housing, burn marks) points to the port. If the port looks fine but charging fails, check Device Manager then Universal Serial Bus controllers for USB Billboard Device errors. PD controller failures show the charger being detected but no charging; a broken port usually means no detection at all.
Does replacing the USB-C port void my ThinkPad warranty?
Yes, opening the laptop and soldering voids the remaining Lenovo hardware warranty. Check your warranty status at support.lenovo.com before starting. If still under warranty and the failure is not caused by misuse, Lenovo may repair it at no cost.
Which ThinkPad models are easiest to repair for USB-C port replacement?
The T480 is one of the most accessible ThinkPads for this repair. The E14 and E15 are also somewhat easier because their USB-C ports have no Thunderbolt. The X1 Carbon Gen 9+ and T14 Gen 2+ are the most difficult due to compact board design and thin chassis.
What happens if I do not clean the flux residue after soldering?
Flux residue absorbs moisture over time and can become electrically conductive, causing intermittent shorts or corrosion. Always clean with 90%+ isopropyl alcohol and a soft brush. Let the board dry fully before reassembly.
Conclusion
Replacing a ThinkPad USB-C charging port is achievable with the right tools, correct diagnosis, and SMD soldering experience. Diagnose the actual cause of failure before opening the laptop, source the correct part for your specific model, and take your time with the hot air rework to protect the motherboard pads.
Older ThinkPads like the T480 are more forgiving than thin ultrabooks like the X1 Carbon. If the pads look damaged or the failure is in the PD controller, professional repair is the smarter route. If USB-C is working but you see driver or Thunderbolt issues after reassembly, revisit Device Manager and check for firmware updates at support.lenovo.com.
Ryan holds a Computer Science degree and has over 20 years of hands-on experience with PC hardware, software, and driver troubleshooting. He is the author behind softwaredriverdownload.com, where he helps everyday users fix driver issues quickly and accurately. Ryan has personally tested most of the fixes on this site across a range of Windows 10 and Windows 11 machines.
Leave a Reply